Articles about Peony planting
Showing posts with label planting. Show all posts

Saturday, May 7, 2022

2022 Planting Intersectional Peony 'Belle Toulousaine'

From my order of 2022 Spring Hill Nursery Sells 2 New Intersectionals - Peony 'Belle Toulousaine' & Peony 'Symphone Pourpre', one of the peonies arrived a couple of weeks ago, Peony 'Belle Toulousaine'. The other one did not come, as I got an out of stock notice for it, which was a bit disappointing, but I am grateful that one of them arrived at least (and from the photos, it looks like it might be the prettier one!)


Box from Spring Hill Nursery
with Intersectional Peony 'Belle Toulousaine'


Bagged Intersectional Peony 'Belle Toulousaine'

The plant was nicely boxed with breathing holes to prevent it from overheating. Inside the box, the plant was bagged, which surprised me, as the intersectional peonies that I've ordered from Spring Hill Nursery have usually been potted in previous years, 2019 Spring Hill Nursery Peony Order Arrives and 2020 Intersectional Peony 'Duchesse de Lorraine' Arrives from Spring Hill Nursery. However upon opening the bag, I could tell that this plant had recently been potted.


Unbagged Intersectional Peony 'Belle Toulousaine'


Intersectional Peony 'Belle Toulousaine' Roots and Stems

The roots were still in the shape of the pot it had been in. It looked as if this plant had been growing in a pot for quite some time, and it was removed from its pot and sealed in this bag just before shipping. I guess it saves them money on pots. Perhaps they will reuse them, which is fine with me, as I will just recycle the pot anyway. As long as the plant grows just as well, I suppose it doesn't matter. The bag also had some information about the peony printed on it:

BELLE TOULOUSAINE ITOH PEONY PP26908
Paeonia itoh 'rtpiv789-06

Light: Full sun to partial shade      Height: 36-40"
Depth: Crown 1-2" below soil line      Spacing: 4'


Intersectional Peony 'Belle Toulousaine' Bag Info


Planting Intersectional Peony 'Belle Toulousaine'

After I got it unbagged, I planted it right away. I dug a nice hole, added some organic flower fertilizer to the hole, and mixed it in. After I got the peony into the hole, I added part of the dirt around it. Then I added water to the planting hole. Adding water to the bottom of the hole will help the plant and roots retain some moisture deeper into the ground, which will help your new plant get a good start! Always remember to put water into the hole before you put all of the soil back!

Planting Intersectional Peony 'Belle Toulousaine'


Planting Intersectional Peony 'Belle Toulousaine'
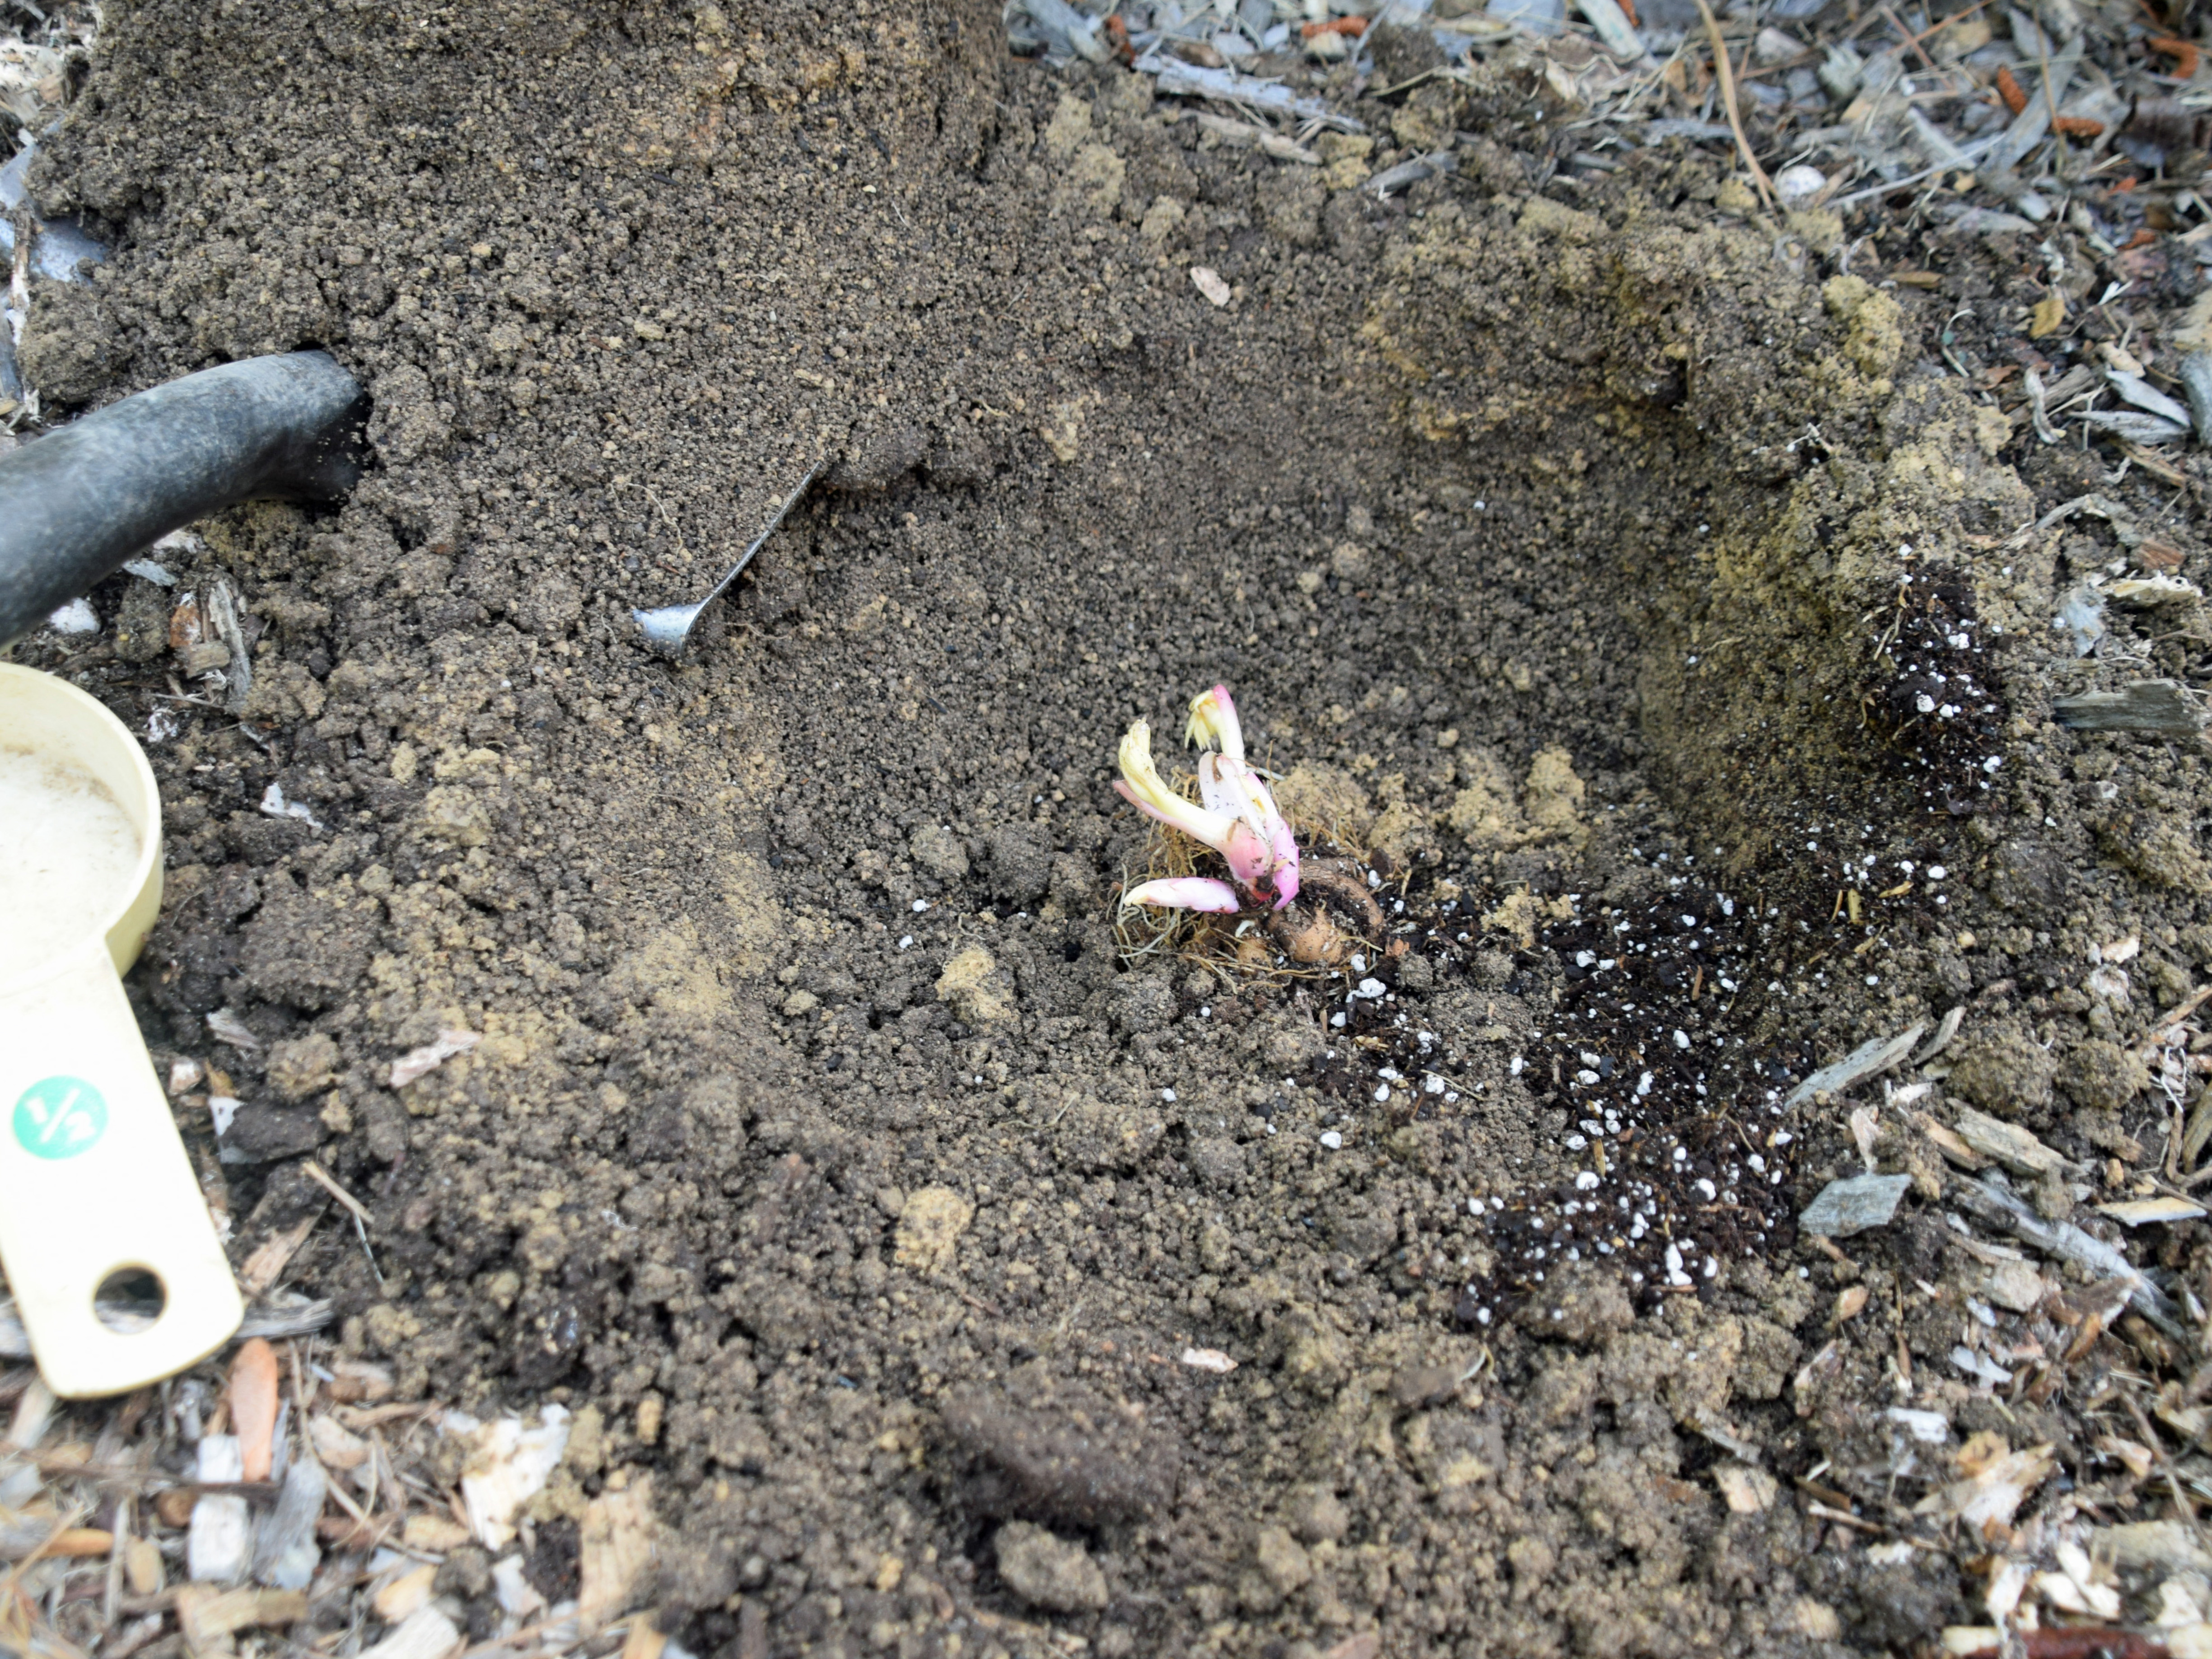
Add Water to the Planting Hole

After the roots and surrounding dirt were thouroughly soaked, I added more dirt to the hole, then I added more water. Making sure to give your plant a good drink when it is first introduced to its new home is essential. As you can see on the first watering, the roots were still exposed, and on the second watering only the foliage was exposed. Then when I added the final layer of dirt, all of the peony was covered except the tip of one of the tiny foliage shoots (the other shoot was just barely under the dirt).


Planting Intersectional Peony 'Belle Toulousaine'
Add More Dirt to the Planting Hole


Planting Intersectional Peony 'Belle Toulousaine'
Add Even More Water to the Planting Hole


Planting Intersectional Peony 'Belle Toulousaine'
Add Even More Dirt to the Planting Hole

Now that my Intersectional Peony 'Belle Toulousaine' is fully planted, I can't wait to see how it grows (and blooms)!! It might still be a couple of years before I get a bloom on this one. It definitely won't bloom this year, and the plant may still be too small next year as well. The peony needs to reach a critical mass size to bloom. This can really depend on the peony variety (and it's growing conditions of course), but I'm sure it will be worth the wait! Come on, grow, grow! :-)


Planting Intersectional Peony 'Belle Toulousaine'


Friday, May 8, 2020

2020 Transplanting an Intersectional Peony 'Bartzella' in Spring to Grandma's House


Transplanting an Intersectional Peony 'Bartzella'
in Spring to Grandma's House

Maybe I was encouraged by the mild spring we've been having. Or maybe I just couldn't bear to see Grandma's yellow peony not thrive and grow another year in a row. So I decided to dig her up one of my Intersectional Peony 'Bartzella' plants in spring and bring it to her. I know that spring is not the best time to transplant a peony, but sometimes you do things when you have the opportunity. Last weekend was one of those days!


Intersectional Peony 'Bartzella'
in My Peony Test Bed Before Digging

So... Here's what I did. I woke up early in the morning because it was actually going to be pretty hot that day. I wanted to dig the plant when it was very early so the plant had the optimum amount of moisture in it when I removed it from the ground. The later in the day you dig something, the more time it has had to sit in the sun and lose water to evaporation. Lucky for me, it had rained the day before quite a bit.


Intersectional Peony 'Bartzella'
Partially Dug

My first plan of action was to dig the plant on one side. I know that sounds a little weird, but I was trying to prevent the loss of and damage to as few roots of the peony as possible. First I moved the sign for it, then I started digging. I started digging far away from the peony to try to find the roots. Once I started to find the roots, I just kept digging underneath them, removing dirt and setting it aside.


Digging Underneath the Roots of
Intersectional Peony 'Bartzella'

This helped increase the visibility in the root zone. As you can see I kind of created a hole or space underneath the plant as I removed more and more soil. I did end up losing 2 large storage roots on the side I was digging. It seems kind of unavoidable to prevent any damage, but I did my best. That's one reason why I decided to only dig from one side. I knew the more sides I dug on, the more roots I'd lose. Eventually I had enough space under the peony that I could grab it from the underneath the crown and base of the roots. Then I just started jiggling it and moving it here and there, using my shovel to loosen underneath a bit if needed, pull, jiggle, pull, jiggle, until it finally came out!


Intersectional Peony 'Bartzella' Finally Dug Out

As you can see, I was thinking was I going to put the peony into this 2 or 3 gallon pot to transport it to my Grandma's house. However you can see that was a laughable idea. If I had even tried to put this peony into that pot, I would have broken off every root I just so carefully extracted and tried to save. So the pot stayed home, and the intersectional peony 'Bartzella' and its giant roots when into a black plastic trash bag instead! The roots on this peony were probably 3 feet across or more!


Intersectional Peony 'Bartzella'
Ready for Transporting in a Black Plastic Trash Bag

When I arrived at Grandma's house I walked around looking for a good spot to plant it. When I had a couple of good ideas, I took Grandma around, told her my ideas for possible spots for it, and let her choose one of those spots. She selected this spot right behind some yellow irises, yellow daylilies, and yellow daffodils. I think it was my favorite spot too. Once the spot was selected I started digging. And digging. And digging.


Transplanting an Intersectional Peony 'Bartzella'
in Spring to Grandma's House

Grandma's house like many properties here has it's share of red mud aka red clay. I was prepared, though, and brought a bag of top soil to mix into the planting hole. I put mixed a half a bag into the planting hole (saving some for other plants in case we needed it). However it looked like I could have put in a whole bag. I also mixed in a cup of 10-10-10 slow release fertilizer pellets that my Grandma had at her house. The hole I dug for this peony was huge. I wanted to make sure I had enough room for those giant 3 foot roots!


Intersectional Peony 'Bartzella'

Once I had everything dug up and mixed in, I started removing soil from the hole. Then I placed the plant in the planting hole. I actually planted this Intersectional Peony 'Bartzella' about half an inch to an inch deeper into the soil at Grandma's house than it was growing at my house. I wanted to give the plant some stability since its roots (the plants normal stabilizers) had just been ripped from the ground placed in different, much looser, freshly dug soil. Also sometimes the soil washes at Grandma's house, and she may not mulch her plants as often as I do.


Intersectional Peony 'Bartzella'

Once the plant was in place, I started the amended and fertilized soil with the shovel until it was mostly refilled. When all of the roots were covered, next I made sure that the plant was balanced and standing up correctly, adding and firming soil in any spots needed to help its balance and stability. I also made sure to leave the plant slightly lower than it's surrounding soil and create a small soil mound around the planting hole to help hold and keep water when watering the plant.


Intersectional Peony 'Bartzella'

After planting it, I watered the peony with two 2 gallon buckets of water. Even though it had rained more than an inch the day before, you alway needs to water in your newly planted plants to help settle the soil, remove any air pockets, and help re-hydrate the roots. This peony looked pretty good after it was planted. However it definitely did sulk later that date in the hot sun. My Grandma put some more water on it again in the afternoon. I told her to keep her eye on it and take care of it this summer making sure it has plenty of water. She said it looked better and less wilted the next day. Thank goodness we've been having some more mild spring temperatures this week. I really do hope this Intersectional Peony 'Batzella' will grow and thrive at my Grandma's house! I'll have to keep you posted on how it does. :-)


Intersectional Peony 'Bartzella'

Sunday, February 3, 2019

2019 Planting Open Pollinated Seed from Last Fall


2018 Open Pollinated Seeds in Bags

I know it is a little late, but I guess I just got back around to it. I finally got my seed planted from 2018. Maybe it was because I wasn't very excited about the seeds that I got, or maybe it was because I wasn't that excited about the number of seeds that I got. Whatever the reason, at least I finally got them planted. I guess I was a little disappointed that none of my intersectional crosses worked last year, 2018 Dismal Seed Production Year. Also it was actually a bad year for seed overall. Usually I have enough seeds that I am able to donate some to the American Peony Society Seed Distribution Program (which is a great program if you are looking to grow peonies from seed). This year, however, I only got 18 seeds, not just from one variety, but total - 18 seeds in total. It was a terrible year for seed production.


2018 Open Pollinated Seeds Planting Bed

I guess I finally decided to be thankful for what Mother Nature has given me (plus I got my label maker working again, well, working enough to print out a few seed labels). So I made a few signs for the seeds and got them planted on this nice 60 degree day in February (another thing to be thankful for, especially after the cold arctic blast we got this past week). I highly doubt these peony seeds will sprout this spring since I planted them so late, but at least they're in the ground. Hopefully I'll see some lovely peony blooms from them a few years down the road...


Sunday, October 14, 2018

2018 Southern Peony Fall Planting

It's that time of year again - fall peony planting time! It's the time when boxes of peony roots converge on your front doorstep all in the same week! What used to be excitement to see the blooms of those new varieties, now becomes pressure to get them all planted! It happens to all of us, the peony bloom photos look so gorgeous, they just draw us in. The ones we've been wanting for years become available, the APS hosts their convention auction, the APS awards its newest Gold Medal winner, the peony farmers hold last chance sales, the APS hosts their Fall Auction -- so many opportunities to find the newest, the latest-greatest, the oldies but goodies, the hidden gems, and the ones you didn't even know you needed! (And if you're lucky enough to have a local club, you might also have the opportunity to buy roots at a local peony fall auction as well!)


Southern Peony Fall Planting

Yes, it can add up to quite a bit of work in the fall to get them all planted, but when spring arrives you know that it will be worth it. And although many of your new peony roots may not bloom the first year, you know they are growing and saving up their energy to make a plant large enough to bloom another year. And as long as you've got them planted in the right place (check out our article on Top 5 Spots to Plant a Peony), you know they will be growing larger and larger every year! One day you'll have a peony (or lots of peonies!) just full of blooms! Happy Fall Peony Planting!!!

Friday, April 6, 2018

2018 Spring Tree Peony Planting 'Kinkaku' & 'Lavender Grace'


Tree Peony 'Lavender Grace' from Song Sparrow

The Tree Peony 'Lavender Grace' that I purchased when 2018 Klehms Song Sparrow Offers Tree Peony 'Lavender Grace' on Front Page of Web Site, arrived this week and so did another peony I ordered from Ebay seller orientalpeony, Tree Peony 'Kinkaku', also known as 'Souvenir de Maxime Cornu'. I got both of them planted this week. They are quite a bit behind my other tree peonies in foliage growth, but we are set to have a nice day of rain tomorrow (after almost 2 weeks on no rain!). So that should give them both a nice cloudy day to settle in after been sun-starved for a few days while in transit. We are also expecting some lower than normal temperatures and since both of these tree peonies came from a colder growing zone, that should help them feel more at home and hopefully begin to adjust to the much warmer temperatures here.

Tree Peony 'Lavender Grace' with Bud

Both of these tree peonies were actually a very nice size, and Tree Peony 'Lavender Grace' even came with a bud on it. Let's hope I can take care of it well enough to see it through to maturity. Tree Peony 'Kinkaku' looks like it will have more foliage than 'Lavender Grace', and it appears to be a bit older too. I can't tell if it has a flower bud on it or not. I guess there could be, but right now it looks like it will not flower this year. All in all I am pretty happy with both of my purchases, and I can't wait to see them grow...

Tree Peony 'Kinkaku' Sprouting


Tree Peony 'Kinkaku' from Ebay


Sunday, November 9, 2014

2014 Transplant Lavender Ruffles Peony Seedling


Peony Seedling Test Bed

This is a current picture of my peony seedling test bed. I wanted to transplant my Favorite Peony Seedling - Semi-Double Pink Violet (which I have nicknamed Peony 'Lavender Ruffles') from this peony seedling bed to a place where it will have more room to grow. The Peony 'Lavender Ruffles' is the peony with the light green foliage to the right of the peony with the powdery mildew. Considering its close proximity to the other peonies affected by the powdery mildew and the fact that it has not totally succumbed to the disease, it seems fairly disease resistant.
Peony 'Lavender Ruffles'
Fall Foliage

The foliage of Peony 'Lavender Ruffles' has an interesting pattern in the fall. It appears to be green edged in gold. The plant is also fertile as well. As you can see from the empty seed pod, it produced seeds in its first year of bloom. After digging up the peony plant, the roots and crown appear to be neat with long storage roots emanating from the crown.
Peony 'Lavender Ruffles'
Seed Pod
Peony 'Lavender Ruffles'
Dug Up

Next I removed the foliage with some pruners before replanting the roots. I moved this peony from my peony seedling bed to my peony seedling test bed. It will have much more room to grow in its new location, and allow me to evaluate it more closely. I also added a garden label beside the roots so that I can find it next spring. When replanting the peony, I accidentally broke off one of its storage roots. I hope it will still bloom again next year. If it does it will have overcome an extra challenge! I can't wait to see how its ruffled lavender blooms look next year!

Peony 'Lavender Ruffles' Pruned and Replanted

Wednesday, April 9, 2014

2014 Questions - Transplanting Peonies in the Spring

I received this question from Bahiyyah in zone 7:
"Hello, I love your blog, I have a question for you. I know transplanting in the spring is not best, but I had no choice. Now I have over 100 peonies to replant. Some are very young with only 3-5 eyes. I know to plant those whole. But what about the ones that have large root masses, but only 3 eyes showing. Is it problematic to replant those whole? I remember reading that once dug up peonies prefer to be split to grow properly. Should I trim some root off those. For a visual imagine 8 big juice carrot sized roots, with only three tiny eyes. Also, do you have any tips for soil amending when planting? I have access to leaf mulch, wood chips, well aged horse manure, worm compost and regular compost. Thank you for any and all advice you can offer"

Thank you for such a nice compliment! You are correct in stating that spring is not the ideal season to transplant peonies. Fall is the best season for moving and dividing peonies. However spring is much better than summer, especially if the peonies have not yet sprouted (which is what it sounds like you are describing when you mention that your peonies have eyes - instead of foliage growth). You may notice some reduction in blooms this year, but provided these peonies are replanted in a good location with plenty of sun and nice soil, they should recover nicely. If any of your peonies had enough stems last year to divide (at least 7-8 stems), then you can go ahead and divide those peonies. However if your peonies didn't have very many stems last year and only have 3 eyes with large roots, I would not divide those peonies. Also it isn't necessary to remove any of the storage roots before planting unless you feel need to remove them for some other reason (ex. unwieldy for planting, unmanageable for transporting, diseased, etc.)

As far as soil amendments, I would recommend the leaf mulch and compost and mixing it well into the soil. The horse manure could also be used, but it definitely shouldn't be applied directly to the roots or crown of the plant. The wood chips could be used as a mulch/top dressing only to prevent weed growth. However it is not recommended to mix these into the planting hole, as they can inhibit the peony root's access to nitrogen.

Wednesday, October 16, 2013

2013 Planting Chinese Tree Peonies


Chinese Tree Peonies Soaking in Water

After soaking the Chinese Tree Peonies from Ali Express, some of them started to look promising. As you can see below on the tree peonies with long stems and short roots, after soaking them in water I started to notice some white or light colored nodules on the sides of the tree peony stems. These may turn into growth nodules, from which roots or stems may be generated in the spring. Also I figured out which tree peonies these are supposed to be. The one tree peony with a short stem and long roots is supposed to be the blue tree peony I ordered. The other 5 tree peonies with long stems and short roots were 2 yellow/orange tree peonies and the other 3 were the ones that were supposed to be the Ali Express Chinese Tree Peonies $5.52 for 3!. I had ordered 3 sets of 3 of these peonies. So I should have gotten 9 of those tree peonies, but they only sent 3. So I opened a dispute with Ali Express for that particular order.

Blue Chinese Tree Peony with Short Stem and Long Root


Chinese Tree Peony with Long Stem and Short Root


Chinese Tree Peony with Long Stem and Short Root

After soaking the Chinese Tree Peonies in a bucket of water for a couple of days, I finally got them all planted Wednesday morning. I planted the tree peony with the short stem and the long root pretty much even with the soil. The other tree peonies with the long stems and shorter roots, I planted about 4-5 inches below the soil, which left about 2 inches of the stem above ground. The majority of the tree peony stems were planted below ground, in hopes they would generate their own roots, just in case the tree peony stems are grafted to herbaceous peony root stock. Now I am feeling a little more hopeful that these Chinese tree peonies will grow in the spring! I'll let you know... :-)

Planted Chinese Tree Peonies from Ali Express

Monday, September 16, 2013

2013 Chinese Tree Peony 'Xiang Yu' ('Fragrant Jade')


Chinese Tree Peony 'Xiang Yu' ('Fragrant Jade') on Ebay

Well I got my first green and growing Chinese tree peony variety this week, and yes, I bought it on Ebay. I know, I know. Ebay is not necessarily the best source for peonies. However I do consider it to be a step above Gilbert H. Wild, who sends lots of mislabled plants, and several steps above Dutch Bulbs or Spring Hill Nursery, which import dry stick like material they call tree peonies. Also to that end, tree peonies are quite expensive elsewhere, and to quote a seller of US grown tree peonies on Ebay,"shipping only for a dry stick from China is $29, and the chance of survival for those plants was 20% in my hand". I was even reading last night in my copy of the First Edition of the Manual of the American Peony Society, that in the 1800s the Chinese tree peony sellers would often cut the roots of the tree peonies or scald the seeds they sold to prevent them from growing. I wonder if that was to increase their future business or, as the author of the APS Manual article surmised, to keep their best varieties to themselves. Let's hope things have changed since the 1800s and sellers don't do that nowadays. I guess I'll find out in the spring when I check to see if any of my Suffruticosa Tree Peony Seeds from China sprout!
Peony 'Xiang Yu' ('Fragrant Jade')
in Shipping Bag
Peony 'Xiang Yu' ('Fragrant Jade')
Unwrapped

Anyway I got this tree peony from an Ebay seller in New York, that grafts and grows tree peonies himself, and the plant looks very nice for the price. It looks nice even for a much higher sum. I've even paid more for one of those dry stick-like tree peonies from a generic garden catalog only to have it die shortly thereafter. This one looks very sturdy and has lots of nice roots on it. The seller said it should bloom this coming spring or the next. I'm hoping for the one coming up!

Peony 'Xiang Yu' ('Fragrant Jade') Stem Root Junction


Peony 'Xiang Yu' ('Fragrant Jade') in Planting Hole

As you can see I planted this tree peony several inches below the soil. I actually planted it at least an inch deeper than the original grower had it planted (which you can see by the moisture mark on the plant's stems). This is to encourage the tree peony to continue to develop roots of its own (which would sprout off of the portion of the tree peony stem that is underground). So the more of the stem that is underground, the more surface area capable of developing roots. I also watered this one before I mulched it. I usually mulch it before I water, but since I was putting so much water on it (hoping to keep it moist), I wanted to make sure the water didn't run out of the planting hole. If you'd like more tips on planting tree peonies, check out this guide on How to Plant a Tree Peony.

Peony 'Xiang Yu' ('Fragrant Jade') Planted


Peony 'Xiang Yu' ('Fragrant Jade') Watered


Peony 'Xiang Yu' ('Fragrant Jade') Mulched