Articles about Peony how to
Showing posts with label how to. Show all posts

Friday, November 6, 2015

2015 How to Cut Back an Intersectional Peony

There are two ways you can cut back an intersectional peony. You can cut the entire plant back to ground level or you can cut the plant back, leaving short stems with growth buds on them. In colder climates, it is preferred to cut the plant back to ground level. However here in the South, with our milder winters, these growth buds on the stems can often survive the winter just like the growth buds on tree peony stems.

Intersectional Peony in Autumn
View From Above

The first step is optional, but it helps me see what I'm doing. I just remove some of the lower foliage of the plant so that I can see what I'm working on. This is very easy to do. If you find where the leaf stem meets the main stem and just put a little bit of downward pressure on the leaf stem, the leaf segment will come off pretty easily. You'll want to have a trash bag handy for all of the foliage and stems you cut away. Peonies often carry botrytis blight. So it is best to trash the old foliage and not compost it to reduce future infections.

Intersectional Peony in Autumn
View From Underneath

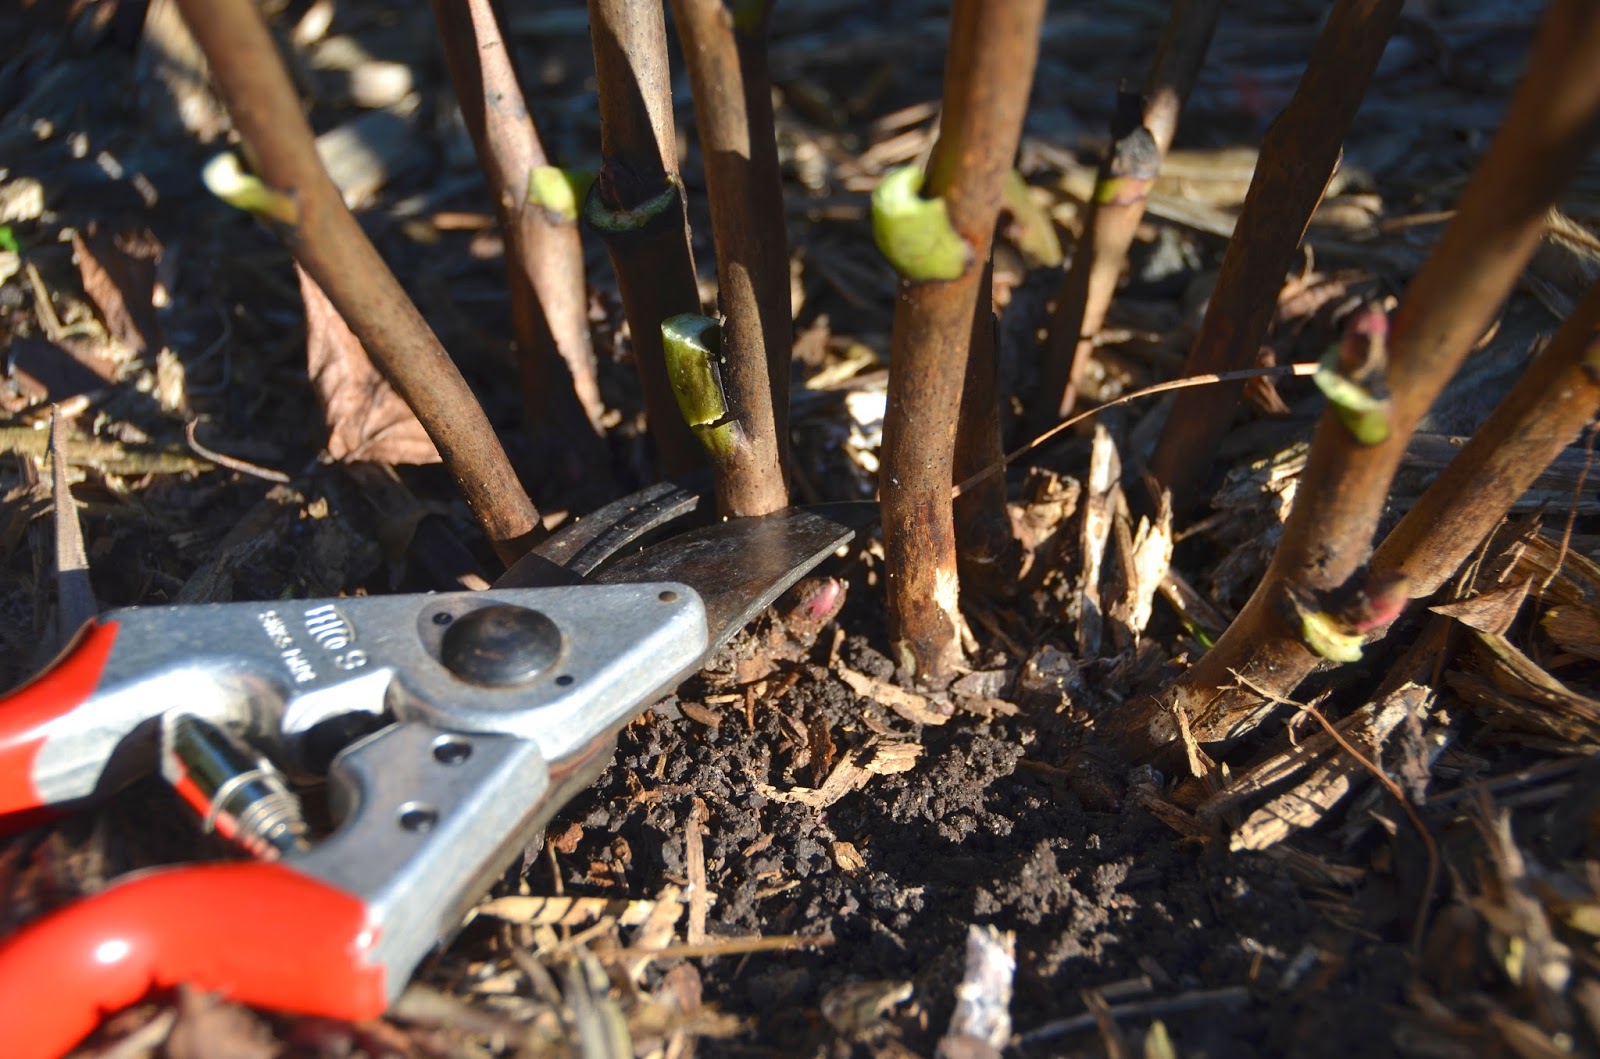
To leave some short stems on the plant with growth nodules, you'll want to prune the stems back to the first or second growth nodule above the soil. Usually you will see a pink growth bud at the stem/leaf juncture. You'll want to prune the stem just above this point. If you don't see any pink growth buds on a stem, you can prune that stem all the way back to the ground, taking care to cut above the pink growth bud at the base of the stem, if present.

Cut Main Peony Stem Just Above Pink Growth Bud

After pruning the upper stem away, you'll be left with a short main stem and a foliage stem. Remove any remaining foliage on the pruned stem by applying a bit of downward pressure to the leaf stem. This will easily separate the foliage from the main stem. Make sure to remove and throw away all remaining foliage on each pruned stem.

Apply Downward Pressure to Peony Leaf Stem to Remove It


Intersectional Peony Being Pruned

Repeat this process on each of the stems until you have pruned all of them. After all of the stems have been cut back and all of the foliage has been removed, you'll be left with just a few short sticks sticking out of the ground where your intersectional peony once stood.

Intersectional Peony Stem Defoliated and Pruned

One advantage of this pruning method, leaving short stems, is that you'll know exactly where your instersectional peony is planted over fall, winter, and early spring. That way you won't accidentally step on it, dig into it, etc. However if you live in a colder climate where these growth buds likely won't survive anyway, or you prefer a cleaner look after pruning, intersectional peonies can be cut back all the way to the ground.

Intersectional Peony Defoliated and Pruned

If you want or need to prune your intersectional peony back to the ground, that's perfectly acceptable. Intersectional peonies are quite hardy once established, and they will definitely come back when pruned to the ground. You'll just want to make your cuts carefully to ensure the basal growth buds are not damaged.

Intersectional Peony Base

If you closely examine the base of your intersectional peony, you'll find where the stems meet the crown. If you have your peony planted even with the soil surface (hopefully you do - if you a Southern peony gardener!), you will likely see some pink growth buds near the base of most stems and on the crown.

Cut Peony Stem Back to Soil Level Just Above Pink Growth Bud

When you cut your intersectional peony stem back to ground level, you'll want to make sure to preserve these pink growth buds. So if there is a pink growth bud at the base of the stem, make your cut just above this growth bud. Also take care not to smash or cut any other growth buds on the base of your plant. Continue pruning each of the stems on the plant until you are left with just the crown and pink growth buds.

Intersectional Peony Pruned to Ground Level

Now you're all done cutting back your intersectional peony. Don't worry if you see the exposed pink growth buds. For Southern peony gardeners, this is a good thing! Don't bury them or cover them with soil or mulch! Those growth buds need to be exposed to as much cold as they can be over the winter to bloom properly in the spring. So leave them uncovered. You may want to put a plant marker near your peony if you don't already have one. That way you'll know exactly where it is, so you won't step on it or damage it over the winter.

Monday, August 3, 2015

2015 How to Fertilize a Peony

There are two main times of the year to fertilize peonies, before your peonies bloom in early spring and after they have bloomed in the later summer / early fall. This is a good time to add a slow release organic fertilizer or composted cow manure around the drip line of your peony plants. Slow release, organic nutrients will be available throughout the season for your peonies. This includes the early spring when they are expending lots of energy to push up new shoots of foliage, and even into the fall when they are storing energy and nutrients to produce next year's foliage and blooms.

Peony Plant to be Fertilized

The first step in fertilizing your peony is to remove the layer of mulch covering your peonies. This layer of mulch is just another barrier between your peony and the nutrients you are trying to give it. If it is not possible or perhaps too time consuming, you can put the fertilizer on top of the mulch. However the peony will have easier access to fertilizer that is directly applied to its soil. Also less of the fertilizer is likely to get washed or blown away.

Peony Plant with Mulch Removed

Since peony plants only produce one set of foliage per year, you will want to make sure to keep it green and healthy. I don't recommend any quick release water soluble chemical fertilizers. These fertilizers will actually 'burn' the leaves of your peony plant and make them turn yellow. Avoid those types of fertilizers and look for something slow release, natural, or organic instead. Since peonies are not continuously producing new above ground growth throughout the season, they do not need a high nitrogen, quick release fertilizer.

Organic Slow Release Fertilizers are Best for Peonies

Some fertilizers that I like to use are Espoma Organic Plant-tone or EcoScraps Natural and Organic Rose & Flower Plant Food. Both of these fertilizers are slow release and organic. They can both be found at local super stores and hardware stores, or you can purchase them online. I also like to use Black Kow composted manure as a fertilizer for my peonies. If you have your own compost pile, then homemade compost is also a great fertilizer. When using compost, you will want to make sure that you use a very thin layer and don't bury your peony with the compost. Most of the time, I will use the bagged organic fertilizers for herbaceous peonies, and the compost for tree peonies since herbaceous peonies's are sensitive to planting depth.


You can use a garden scoop or measuring cup, whatever you're comfortable with to apply the fertilizer. I like to use a measuring up so I know exactly how much I am putting on each plant. Sprinkle the fertilizer lightly over the soil. Make sure to apply the fertilizer around the drip line of the peony's outer most leaves in a round circle like shape. Be careful not to dump the fertilizer directly on the peony's crown. It likely won't do as much good in this location since most of the storage roots are under the crown, and the feeder roots are generally around the outer edge of the foliage drip line. Optionally you can work the fertilizer into the soil a bit with your fingers or a small garden cultivator, taking care not to disturb the peony's roots. If you are short on time or you are worried about disturbing your peony, you can skip working the fertilizer into the soil.

Replace the Mulch Around Peony

After you have applied your fertilizer, the last thing to do is to replace the mulch around your peony. This will keep the fertilizer from washing away, and give nature a chance to incorporate the fertilizer into the soil during your next few rainstorms. If it has been particularly dry lately, you can also water in the fertilizer yourself with a garden hose or watering can. Now you're all done. This should give your peony a great start to the next growing season!

Monday, July 13, 2015

2015 How to Deadhead an Intersectional Peony

Deadheading your intersectional peonies is really a personal preference. I actually prefer to leave the seedpods on my intersectional peonies. The seedpods actually provide some additional interest and height on the bush. Since intersectional peonies do not actually form seeds 99% of the time, the plant is not wasting any energy creating seeds if you leave them on. On the flip side since there not any seeds being created, you don't have to leave them on for seed production. Also some gardeners may find the bush more aesthetically pleasing without them. So this guide is intended to help all of the intersectional peony pruners out there. The method to Deadhead an intersectional peony is not too different from the method of How to Deadhead an Herbaceous Peony.

Intersectional Peony 'Pastel Splendor' with Seedpods

Deadheading is the process of removing the spent bloom heads from your peony plant. To start this process you'll want to have your favorite pair of pruners and a trash bag handy for deadheading. Since it is not a good idea to compost your peony clippings due to fungal blight concerns, you will want to throw away the seedpods after pruning them from the peony bush. When you prune the seedpods from the plant, you'll actually cut off a portion of the stem. This portion of the stem can definitely carry fungal spores in the stem tissue. So put the seedpods in your trash bag after you've removed them.

Intersectional Peony Seedpods Remain After Flowering


Intersectional Peony Seedpod

Take a look at the seedpod you'd like to remove first. If you follow the stem down to the first leaf junction, you'll find the point where you'll want to prune your plant. You'll want to make your cut just above the leaf junction to trim the stem down to this point, while preserving as much of the foliage as possible. After you make the cut, collect your deadheaded seed pod and put it in your trash bag. Simply repeat this process for each seedpod on your peony plant until you have removed all of them.

Pruning Intersectional Peony Seedpod

After pruning your intersectional peony, the plant will appear a little cleaner, and a little greener. Now is a good time to add a slow release organic fertilizer or composted cow manure around the drip line of your peony plants. Slow release, organic nutrients will be available throughout the season for your peonies, even into the fall when they are storing energy and nutrients to produce next year's blooms.

Intersectional Peony After Pruning

Also if you have any extended periods of drought over the summer, you will want to give your peonies some additional water to keep the foliage from wilting. Peonies are tough plants, and they can definitely withstand some drought. Mine have several years, but the plants will be healthier with some added water. That's it. Sit back, enjoy the green, and start dreaming about how many big beautiful blooms you'll have next year!

Intersectional Peony 'Pastel Splendor' after Deadheading

Friday, November 14, 2014

2014 How to Divide an Herbaceous Peony

Since it's that time of year, and I needed to divide a few peonies of my own I wanted to create this illustrated how to divide an herbaceous peony guide. Let talk about reasons why to divide a peony and what would qualify as a peony that needs division or would be okay to divide. The reasons to divide a peony are to create more of the same peony to plant in your garden, to give a peony to someone you know, or maybe even to sell a piece of your peony. As far as what peony would qualify as a peony to divide, I've heard a rule of thumb is a peony with at least seven stems. However as you can see, the peony in this guide has many more than seven stems. This particular peony has more than 25 stems!

Cut Back the Peony Stems

First you should cut back all of the stems on your peony. When cutting back peony stems for the winter, I usually cut them back to the ground. However when dividing a peony it will probably help you see where and how to divide the peony if you keep the stems a little longer (about 2-3 inches). A longer stem left on the peony division will also help its new owner figure out the correct way to plant it!

Dig the Peony Out of the Soil

Next, after your peony has been cut back, carefully dig in a circle around the peony. I usually try to dig a circle that is about 1 foot away from the peony stems to try to preserve as many of the roots as possible. After you have dug a circle around the peony, next try digging a little underneath the peony all the way around it, until you are able to lift it above the soil.

Wash Off Your Peony Roots

After you have removed your peony from the soil, you should take it to a place where you can give it a thorough rinse. As you can see I had a little helper to help me with this part! A garden hose with a stream nozzle that has a little bit of power behind it will help get the soil out of all of the nooks and crannies in your peony root.

Let the Peony Rest for at Least One Day

As you can tell from the picture, my peony root is now dry. That's because it's been sitting in the same spot for a couple days. It took me a little while to get back to it. Your peony root should be given time to sit and rest before you divide it. Otherwise you will accidentally snap of lots of your peony's storage roots. When you first dig a peony from the soil, the roots are very firm and easy to break. After the peony sits for a day, the roots will be softer and a little more limber. You should still be careful with the roots because they can still break, but they will be much easier to work with than if you had tried to divide your peony right after digging it.

Find a Nice Spot to Divide Your Peony

After your peony has had a chance to rest and soften up, find a nice spot to divide the peony. Look for a spot that your garden knife will go into nicely and it seems it would be easy to cut. You don't have to divide off one piece at a time. In fact I just divide mine in half and then half again and so on until I get the size divisions I want.

Separate the Peony into Two Pieces

Next after you have separated your peony into two separate pieces, look at each piece to see how many stems and or eyes are on each division. If the roots are large enough you may be able to divide them again, just as I could with this peony. The rule of thumb is that peonies should have at least 3 to 4 eyes on them to grow nicely. If you want a larger plant that will bloom even sooner, you may want to leave 6 to 8 eyes on your divisions.

Examine the Divisions to See if They Can Be Divided Further

If one of your peony roots is large enough that you can divide it into smaller pieces, find a spot on the peony root that the garden knife will fit nicely and allow you to separate it into two pieces with at least 3 to 4 eyes on each piece. Try to make the smallest cut possible so that you don't snap off any storage roots.

Cut the Divisions into Smaller Pieces (If Needed)

After you've divided your division, separate it into separate pieces. Remember not to make the divisions too small. If you have less than 3 to 4 eyes, it could take extra YEARS to get your peony to a good blooming size. So when it comes to dividing peonies, bigger divisions are much better than more divisions.

Separate the Divided Division

Then examine the other half of your original peony to see if it can be divided further as well. If so, repeat the steps above to divide that half into smaller divisions as well.

Divide the Other Half of Your Peony (If Needed)


Find a Spot Where the Garden Knife Fits Easily


Separate the Divisions


Cut the Divisions into Smaller Pieces (If Needed)


Results of the Peony Divisions - 5 Pieces

Sunday, August 31, 2014

2014 How to Plant Peony Seeds

The first step in planting peony seeds is soaking them. This step is not required depending on how fresh your seeds are and whether you feel like soaking them. I usually soak purchased peony seeds just because I'm not sure exactly how they've been handled, and I really have no way of knowing how old they are. If you do decide to soak them, I would recommend soaking them overnight in individual containers separated by peony variety.

Soak Peony Seeds

Next when you're ready to plant your seeds, gather all the needed materials to do so. You'll need the seeds separated by variety, some sturdy plant markers to mark the seeds, and something to poke (pen or pencil) or dig (trowel or shovel) into the soil with. If I don't have very many of a variety, then I will just plant them by poking small holes in the soil rather than digging.

Materials Needed to Plant Peony Seeds

If you have lots of one variety (like more than 10 or 15), then you will probably want to use a trowel or small shovel to make a shallow hole where you'd like to plant your peony seeds. I usually plant my peony seeds about 1 inch deep to make sure they don't get heaved, scratched, or eroded out of the soil. I also usually plant my peony seeds about 1-2 inches apart. This is too close to grow peonies. However all of your seeds may not germinate, and you can always move them to a different location after 1 or 2 years when they start to get larger.

Dig a Shallow Hole for the Peony Seeds


Plant Peony Seeds in Soil

After you have a flat shallow hole dug for your peony seeds, you can scatter them in the bottom of the hole or arrange them neatly in rows and/or columns according to your preference. Next cover the peony seeds with the soil you removed from your shallow hole.

Cover the Peony Seeds with Soil


Poke the Soil to Make a Planting Hole for a Peony Seed

An alternate method of planting the peony seeds would be to poke a hole in the soil for each seed and plant them individually. This method is good when you only have a few seeds of each variety to plant. I usually use a pen, pencil, or marker to make a small hole in the soil. Then I drop the seed into the hole, and use the writing implement to press the seed into the bottom of the hole. Then cover the seed with the surrounding soil.

Plant Peony Seeds

After your peony seeds have all been planted, make sure to water them and keep them moist! This is a very important step! I usually use a watering can with a rain drop head to lightly sprinkle the water over the seeds. This will prevent the soil from washing away and uncovering your peony seeds. Now just keep them watered and wait for them to sprout! Fresh peony seeds may germinate the next spring if planted promptly after they are ripe. However older seeds may take another year before they germinate. (That's why it is super important to have a sturdy seedling label that won't be heaved out of the soil in the winter.) Be patient and you will be rewarded!

Water Peony Seeds

Tuesday, June 18, 2013

2013 How to Deadhead an Herbaceous Peony


Peony with Spent Blooms

After your herbaceous peonies have finished blooming, you can deadhead them (remove their spent blooms). There are several purposes of this. Firstly, it keeps the plants looking neat and tidy. The dried brown flower petals and sepals aren't very attractive hanging on the plant. Secondly, it prevents the spread of disease. The petals of peonies are perfect hosts for fungi to grow. If left on the plants, they absorb and hold moisture and warmth very well, making a perfect home for a fungus. Thirdly, it allows the peony to divert its energy towards creating a larger root instead of developing seed pods and seeds (unless you want to grow a peony from seed). With a larger root, the peony can develop into a larger plant the next growing season.

Brown Peony Petals and Sepals

When pruning the peony plant to remove the dead blossoms, the plant should only be cut back to just above the next leaf node. Take your pruners and follow the stem from the top near the bloom or bloom cluster down to just above the next leaf nodule. This is the point where the peony should be cut back. Use pruners that have been disinfected to make a clean cut at this point. You can use rubbing alcohol or vinegar to disinfect your clippers between cuts. I usually keep a small, lidded, plastic container filled with one of these biodegradable disinfectants to dip my clippers in while pruning.

Prune Peony Right Above the Next Leaf Nodule

Since peonies do not continuously produce new foliage growth, as much of the foliage should be preserved as possible. The leaves of the peony plant are needed to generate energy for storage in the peony's underground tuber. The plant will use this stored energy to regenerate itself the next year. Sometimes I will prune the plant back a little further than the next leaf nodule if I find a stem that has been severely affected by disease. This is identifiable by black spots on the stems or leaves, wilting, and/or leaves or stems that have turned totally black. If you find a stem like this prune that stem back to the next healthy leaf nodule. If the entire stem has been affected and turned black, remove the entire stem, and be sure to bag it for garbage collection.


That's it. If your peony was newly planted last fall, you should water it during any summer dry spells to help it survive its first year. Now your peonies are ready to collect as much energy as possible until the weather gets cool and the foliage goes dormant! At which point you'll need to learn How to Cut Back an Herbaceous Peony. That's why I love peonies, they are relatively carefree and deer do not eat them! :-)

Neat & Tidy Deadheaded Peony

Wednesday, April 17, 2013

2013 How to Plant a Tree Peony

Tree Peony Stem and Roots
Tree Peony Stem Root Junction

Tree Peonies should be planted similar to Herbaceous Peonies, except much more care should be taken to make sure the stem and roots are facing the proper directions. This is important for herbaceous peonies as well, but more so with tree peonies.

Dig Hole for Tree Peony

The first step and perhaps the most important step in planting a peony is preparing the soil. I usually dig at least a 3 foot round hole for each root, spading the soil with my shovel to make sure the dirt is nice and loose. After the hole is dug and the soil has been loosened, I add some organic fertilizer and lime (dolomitic limestone) to the soil in the hole and mix it in. The fertilizer is used to add nutrients to the soil and the lime is used to adjust the PH of the soil. In my area, most soils are acidic, and peonies prefer a more neutral to very slightly acidic soil, around a PH of 6.0 to 7.0.

Put Tree Peony Root in Planting Hole

Next take a look at the tree peony's roots and make a small hole in the middle of your 3 foot round hole that will accommodate the size of the peony root. Tree peonies keep above ground woody stems, whereas herbaceous peonies do not. The tree peony will have a definite delineation between the roots and the woody stem. The woody stem may have pink buds on it, or it could have died back, in which case the new shoots and foliage would emerge near the bottom of the stems/top of the roots. So make sure to put the roots into the soil and put the woody stem(s) pointing up towards the sky. In my southern climate the point where the roots meets the stem can be planted even with the soil, so that the roots are below the soil and the stems/buds are above the soil. However if you have a grafted tree peony, it is advisable to plant the stem/root junction a few inches under the soil to, hopefully, allow the tree peony stem to form roots of its own and prevent the herbaceous peony root from creating its own foliage shoots.

Cover Tree Peony Roots with Soil

Once the tree peony root has been covered with soil, I cover the planting hole with a 1-2 inch layer of mulch. You don't want to put too much mulch on peonies in this climate. Otherwise the roots may not get enough chilling hours needed for blooming. They do however need enough mulch to retain moisture (It does get really hot here!) and prevent weed growth. After the peony has been mulched, I water the newly planted peony plant. You can water your root before or after you mulch it. I just like to water mine afterwards because it seems like the soils stays in place a little better with the mulch already on top.

Mulch Tree Peony